A tiny slice of my life

This is a look at my life, and the many things I try to learn and do.
Showing posts with label Desserts. Show all posts

Friday, December 21, 2012

What Have I Been Up To ... Christmas Sewing & Cooking

Well I haven't forgot you all I have just been very busy getting Miss Le Coiffures quilt finished for Christmas.

All I have to do today is sew on the binding then I can sit tonight and hand sew it down.

Here is it as I have left it, after Christmas when Miss Le Coiffure has seen it I will post pictures showing you all the details.

Also for little Layla "Sweet Pea" I have already made 2 Santa stockings one for her house and one for Nanas house it feels strange saying that, I have gone from being a Mum to a Nana.

So I have been working on her Santa Sack, which I will finish after I have posted this.
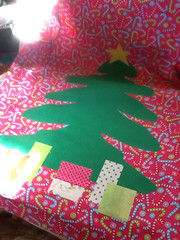
Isn't it cute for a little cutie.

Ice cream

Now what have I been up to ths morning some gentle beating using the electric mixer and some stress relieving using my marble rolling pin on some candy canes.

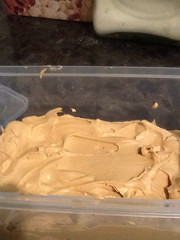
The end result vanilla ice cream, coffee ice cream and my christmas favourite candy cane ice cream. It is divine with its peppermint flavour and pieces of candy cane.

I must admit it is a very easy recipe

Ice cream recipe
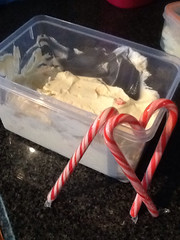
1 x 600 ml bottle of cream & 1 1/4 cups icing sugar beaten to soft peaks.

This year I divided it in half and flavoured one half with vanilla not essence or extract but the actual seeds and the other half I mixed in broken candy canes.


That is were the gentle stress relieving bashing of candy canes comes in, because you want some pieces but also the fine dust which will flavour the ice cream.

Then comes the coffee ice cream. Now normally I make the ice cream above and add coffee flavour and crushed chocolate coated coffee beans, but as I have been so busy I haven't been looking for the coffee beans.

I fell upon the recipe I used on the internet yesterday , it is from Nigella's new show Nigellissima and is dead easy.

http://www.bbc.co.uk/food/recipes/one-step_no-churn_coffee_88525

If mixed the coffee and liquor in the bottom of the bowl while I measured the other ingredients. This gave the coffee time to dissolve.

Coffee ice cream

300 mls Cream, 175 grams condensed milk, 2 tbsps instant expresso coffee powder & 2 tbsps coffee liquor - I used tia Maria

Mix coffee & liquor together in your mixing bowl, add cream & condensed milk. Beat till very soft peaks form it took about 3 minutes in my mixer, stop scrap down sides keep beating till soft peaks form. Place into a sealable container a freeze 6 hours or overnight.
Well if I don't get a chance to post again before Christmas from the CLI family we wish you a very Merry Christmas and a safe New Year.

 

Monday, September 3, 2012

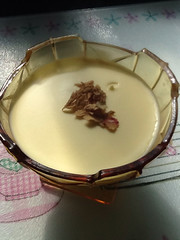
Rose Water Pannacotta

A few weeks ago Mr CLI , Miss Le Coiffure her partner and myself went away for a long weekend a Daylesford . While we were there we ate at Ruebens restaurant, which I have written about before.

One of the desserts was rose water pannacotta , now Miss Fish normally doesn't like anything like this, but she tasted it and fell in love with its creaminess and lightness also the lovely rose flavour.

She even liked it so much she got it the next night from the takeaway menu.

She has been asking for me to make, using the excuse that the "baby wants it " ! As she is 8 months pregnant and seeing her eat is a good thing.

So i decided to make it as one of the desserts for Fathers Day.

I hope everyone had a lovely Fathers Day. Mr CLI wanted a roast for lunch and he wanted to cook the meat on the covered BBQ. So he cooked the piece of pork and the chicken. While I cooked the roast vegetables the cauliflower and cheese sauce, steamed the peas and made the gravy !

I used a Gordon Ramsey recipe. Now I did alter it slightly when the cream is taken off the heat I added the sugar straight away and stirred until it had dissolved, then I added the rose water.

For the first batch, because I made 2 knowing someone would like to take some home, I put in 3 tbsps of rose water, then in the second I used 4. I believe the 4 gives you a more rose flavour.

Also the recipe states to use 2 gelatine sheets, I used the titanium ones. Now the pannacotta did set but if you had wanted to upend it onto a plate I think it would have collapsed . So if I was going to do that in the future I would use 3 sheets, but as I had made individual portions it wasn't a problem.

The verdict on the pannacotta was a resounding success. Miss Le Coiffures comments was that "now she doesn't have to go to Ruebens to get her pannacotta fix".

Gordon Ramsey's original recipe

http://www.bbcgoodfood.com/recipes/598631/lemon-thyme-panna-cotta-with-raspberry-granita

My version

Rose Pannacotta

600 ml cream, 150 ml full cream milk, 100 grams caster sugar, 4 tbsps rose water, 2 - 3 titanium gelatine sheets

Place the gelatine sheets in cold water to soak.

In a saucepan bring the cream and milk to a boil. As soon as it boils remove from the heat and add the sugar, stir until there is no grittiness in the bottom of the saucepan.

Stir in the rose water. Squeeze any excess water from gelatine, the drop it into the hot cream mix and stir till dissolved.

Leave to cool slightly. Pour through a fine sieve into a jug, this makes it easier to pour into individual dishes or one large dish.

Refrigerate til set. This would be at least 4 hours but overnight would be better.

Tuesday, May 15, 2012

Goodness Its Tuesday and Caramel Dumplings

Well Monday disappeared again I didn't even get to my emails till 5 pm last night !

This recipe is one from my old Women's Weekly cookbook from my home eco classes at High School. As always I have altered the recipe to produce more caramel sauce.

You need lots of sauce and then the dumplings swimming  in cold cream.

As you can see by the photo they aren't the most pretty thing but they sure are absolutely scrumptious.

They are light and fluffy inside with a thick caramel sauce.

Not only are they yummy but they are also quite easy to make.

In a large saucepan you bring all the sauce ingredients to the boil, while you are doing that you mix together the dumplings then drop balls of dough into the sauce, clamp a lid on, reduce the heat and wait 20 minutes till your yummy dessert is ready.

Caramel Dumplings

Dumplings - 2 1/2 cups SR flour, 1 tsp vanilla extract, 1/4 cup caster sugar, 3/4 - 1 cup milk


Mix together in a large bowl the flour, vanilla and sugar, add enough to milk to form a soft dough that can be rolled into balls.

Roll the dough into golf ball size balls and drop into the sauce.

Sauce - 60 gms butter, 1 cup brown sugar, 2 cups water

Place all ingredients in a large saucepan, bring to the boil.


When boiling add dumplings , reduce heat to medium.


 Put on a lid cook for 20 minutes.


Serve and enjoy !

Wednesday, May 2, 2012

Plum Clafouti

Now this is a very simple recipe that can be in the oven within 10 minutes.

You can use any fresh of tinned fruit for the clafouti. As I have mentioned before Miss Fish helps out at a food bank and part of her "pay" is a bag of the food. As a consequence I have a pantry overflowing with tinned fruit.

So for this I used two large tins of plums, as they were whole I had to remove the stones as a consequence the fruit broke up, but it didn't affect the flavour.


Fruit Clafouti
2 large tins of drained fruit or enough fresh fruit stones removed and cut in half to cover the base of your pie dish

1 x 20cm pie dish + extra caster sugar to sprinkle on top

Preheat oven 180.c

clafouti - 1 1/4 cups milk, 1/3 cup caster sugar. 3 eggs, 1 tsp vanilla extract, 1/2 cup SR flour

Place all ingredients in a food processor, process for 1 minute pour over fruit. Bake for 20 minutes then sprinkle with extra caster sugar, continue to bake for further 30 - 40 minutes or until cooked.

Serve with cream or ice cream.


Monday, January 30, 2012

Caramel Pinwheels

Well I hope everybody managed to stay cool over the weekend, we certainly had our airconditioning running to keep us cool, because of thil I was able to use the oven and make these yesterday for afternoon tea.

Now I have been making these for many years. It is a recipe I invented by using a soft scone dough and adding butter and brown sugar to create the caramel.

When my girls were young they thought - and actually still do - that these are pretty special to eat straight from the oven.

Now the amount of pinwheels you make depends only on how much dough you make, the amounts given will give you about 20 pinwheels plus 2 that ended up in Miss Fishes tummy.

Don't do what I did yesterday and use patty cake cups use muffin cups which will contain most of the overflow when the butter and sugar bubble and make caramel.

Also these are cooked on quite a high heat so that the scone dough puffs up and cooks and the butter and sugar create a caramel.

Caramel Pinwheels
2 cups SR flour, 1 egg, 2 tbsps butter, melted, 1/4 - 1/2 cup milk

For filling - butter spread or softened butter  and brown sugar

Preheat oven 220.c Place muffin cups onto a tray.

Put the flour into a large bowl add egg and butter, using a metal butter knife stir in add 1/4 milk. Stir just enough to see if the dough is going to come together, if it isn't add more milk.

You want the dough to come together but still to be a bit sticky. This will give you a really light pinwheel.

Now tip onto a floured surface using your hands, you will probably need to flour them, flatten the dough into along oblong with the longest side facing you, about 10cm (3") wide and 1 cm (1/2") thick and as long as the dough will spread.

This is best done with yours hands as using a rolling pin will toughen the dough.

Now spread the butter thickly over the entire length of the dough, then sprinkle liberally with brown sugar  (about 1/4" thick) .

Now roll into a pinwheel by taking the long edge furthest away from you and rolling it out towards yourself. You should get about 3 or 4 rolls.

Using a knife cut into 2 cm slices place into muffin cups cut side up.

On the tray ready to go into the oven.


Bake in the oven 10 - 15 minutes. This all depends on your oven, I bake these in my smaller oven so they only take 10 minutes.

You will know when they are cooked as the will have puffed up and be browned on the top slightly and the caramel will be bubbling in the pinwheel.

Remove from the oven and eat. These really are the best when eaten straight from the oven and I must admit I pull them into halves and spread on a little butter not necessary but enjoyable all the same.
Just out of the oven with the caramel still bubbling.


Cooks treats the overflowed caramel I let it set for a second them scraped it off. Yum !

Wednesday, November 23, 2011

An apple of a Dilemma

After making the chicken pot pie the other night, I was left with 3/4 of a sheet of pastry. As this was the only bit I had left I wasn't going to freeze it, but what to do.

Light bulb moment I had 1 apple in the fruit bowl why not make apple turnovers, one for each of us to have with ice cream.

This is what I did.

Now when I sat down to write today's blog I had a feeling of de ja vue, what was niggling in the back of my mind. Mmmmmm

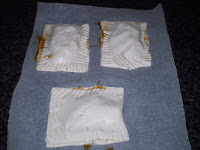
What it was , was that I had already given the recipe for apple turnovers, never mind I will give you the amounts needed to make using 1 apple. This made 3 well filled turnovers. I did sprinkle a little caster sugar on top of the egg wash to give the pastry an extra crunch.

1 apple, 1 tbsp butter, 1 heaped tbsp brown sugar, 1 tbsp water, pinch of both cinnamon and star anise.


This is how the apple should look after being cooked.


Then follow the recipe in the attached blog.


Ready for the oven.


So back to the sewing machine for me, I am quilting a quilt for the lounge in our kitchen area.

Tuesday, October 11, 2011

3 Ways with Stale Bread

Now in our society we are encouraged to reuse and recycle, this can easily be done by thinking outside of the box when trying to reuse leftovers.

Now most people would throw out stale bread or perhaps turn them into crunchy croutons, but here a 3 recipes for stale bread that might give you inspiration to use it in other dishes.

I have travelled to Italy for inspiration, they seem to have lots of recipes for using stale bread. I have adapted some of Lidia Bastianich's recipes

Lasagna
1 bottle passatta, approx 16 , 2 cm wide slices stale bread, 1/2 tsp salt, olive oil, 2 cloves garlic finely sliced or grated, 1/2 onion finely diced, 1/4 cup chopped fresh oregano - or you can use basil or parsley or a combination of all, 2 cups grated Parmesan or 1 cup of each grated Parmesan and mozzarella

Preheat the oven 180.c

Heat 3 tbsps oil in a frypan add the onion, saute over medium heat till it begins to soften. Add the garlic, saute 30 seconds, then add tomato passatta, simmer 15 minutes or until it thickens. Stir in the herbs then season with salt.

Place some boiling water into a shallow dish. Brush the base and side of a 20cm x 30cm baking dish. Place a ladleful of sauce over the bottom, quickly dip the bread in the water turn over and dip again, this will soften it, place in a layer over the sauce, sprinkle with some more sauce then some cheese continue layering making sauce then cheese the final layer.

Bake for 2- 25 minutes until the lasagna is heated through and the cheese is golden and bubbling.

Rocket, Bread and Potato Soup

750gms medium-size potatoes, peeled, washed, and cut into 1/2-inch slices,7 cups water ,salt, 500 gms rocket,½ cup day-old Italian bread, without crusts, diced, 4 tbsps extra-virgin olive oil, 6 garlic cloves, peeled and crushed, ½ teaspoon crushed chilli flakes, ½ cup Pecorino Romano cheese, freshly grated

In a deep, heavy pot combine potatoes and 7 cups water. Salt the water lightly and bring it to a boil. Adjust the level of heat to medium-high and cook the potatoes, covered, until they are tender, but still hold their shape, about 18 minutes.

Wash the rocket in cool water to remove all sand and grit, changing the water if necessary. Drain the rocket well and cut it into 5 cm lengths. Stir the rocket and bread into the pot. Continue boiling 10 minutes.

Meanwhile, in a separate pan, heat the olive oil over low heat. Add the garlic and chilli and cook until golden, about 3 minutes.

Scrape the contents of the skillet into the pot. Stir well. Season the soup with salt to taste. Serve in warm bowls, sprinkled with grated cheese.

Now for some thing sweet

Bread and Butter Pudding

75g unsalted butter, 75g sultanas, optional 3 tablespoons dark rum or other liquor of your choice, 10 slices bread approx, optional jam of your choice, 4 egg yolks, 1 egg, 3 tbsps caster sugar, 1 tsp spice of you choice - cinnamon, cardamom, anise etc, 500ml double cream, 200ml full-fat milk, 2 tbsps demerara or raw sugar

Preheat the oven to 180°C.

Grease a pudding dish with a capacity of about 1½ litres with some of the butter.

Put the sultanas in a small bowl, pour the rum over, and microwave them for 1 minute, then leave them to stand. This is a good way to soak them quickly but juicily.

Make sandwiches with the bread, with butter and jam if using , you should have some butter left over to smear on the top later.

Now cut the sandwiches in half into triangles and arrange them evenly along the middle of the pudding dish. I put one in the dish with the point of the sandwich upwards then one with flat-side uppermost, then with point-side uppermost and so on, then squeeze a sandwich-triangle down each side - but you do as you please. Sprinkle over the sultanas and unabsorbed rum that remains in the bowl.

Whisk the egg yolks and egg together with the caster sugar, and pour in the cream and milk. Pour this over the triangles of bread and leave them to soak up the liquid for about 10 minutes, by which time the pudding is ready to go into the oven. Smear the bread crusts that are poking out of the custard with the soft butter, mix the spice and demerara sugar together and sprinkle this mixture on your buttered crusts and then lightly over the rest of the pudding.

Sit the pudding dish on a baking sheet and put it in the oven to cook for about 45 minutes or until the custard has set and puffed up slightly. Remove, let sit for 10 minutes - and spoon out into bowls, putting a jug of custard, should you so wish, on the table to be served alongside.


So next time you go to throw out your stale bread have a think about how you can reuse it and make it into something much more tasty.

Thursday, August 25, 2011

Another Best Ever Recipe for Mini Pavlovas

Following on from yesterdays theme here is my all time best recipe for pavlovas. I always make small ones, as they can stay in an airtight container for a week. So you can enjoy them for longer.

I always make these for Christmas , I then make home made vanilla ice cream, some of which I add crushed peppermint candy canes. Nothing says Christmas to me than pavlovas and rich home made ice cream with the flavour of peppermint.

You can also make a quick fruit sauce by putting some frozen berries and caster sugar in a saucepan, bring to the boil simmer for about 5 minutes or until the juices have thickened. Leave to cool then pour over whipped cream or ice cream.

Now this recipe can be multiplied by the number of egg whites.

Pavlovas
2 egg whites, 1/2 cup caster sugar

Preheat the oven 120.c .Line baking trays with baking/parchment paper.

Beat the egg whites in an electric mixer until soft peaks form. Slowly add the sugar and continue beating until thick and glossy.

Drop large spoonfuls onto the baking trays, flatten the top a little to form a dip for putting ice cream or cream in when serving.

Bake for 45 minutes - 1hour or until firm to the touch, turn off the oven, then leave the pavlovas in the oven. Leave the door ajar until the pavlovas have completely cooled.

Thursday, August 18, 2011

Thai Jelly Desserts & Pandan Custard

Now on one of our trips to Adelaide I bought up on packets of Thai jelly's and custards. Into the back of the cupboard they went to be used for a special occasion.

When I had my Chinese banquet the other week I thought why not try to make some of the layered desserts you can get in restaurants.


So Miss Fish and set about making layered jelly and pandan custard.


Pandan custard packet


Now for those of you that have never heard of or tasted pandan it has the most divine flavour, a flavour that isn't strong it is very hard to describe. It is refreshing without being overpowering.

Now these are very easy to make all the jellies it is just a matter of bring the jelly powder and water to the boil, whisking to make sure that the powdered has dissolved. As they have agar agar in them by the time I had poured the first jelly into the bottom of my different moulds the first mould had set.


Thai fruit flavoured jelly


It was just a matter of making the jellies one at a time then layering them. I made coconut, fruit and almond. They unmoulded quite easyily, but for some reason some of them the layers separated, but I just slid them back together.

For the pandan custard it was just a matter of mixing the powder from the packet with water and stirring for 30 seconds and I had custard.


Almond flavoured jelly


Now would I bothered with little moulds next time probably not, I would do as you see in the restaurants pour them into a large baking tray and make several thin layers then cut into shapes.

So next time you are in an Asian grocers look for the different jellies and custards they are not very expensive and are quite easy to make, especially look out for the pandan custard it is divine. I have actually got some pandan essence that I have never used I now have to think of ways of using this flavour in other desserts Yum !!


Wednesday, August 10, 2011

Apple & Cinnamon Tarte


Now this would have to be the easiest recipe that produces an amazing result. There are only 5 ingredients it only took about 5 minutes to put together and in total it took 16 minutes to cook.

The recipe is one that I have torn out of a magazine, I believe Gourmet Traveller.

Now the apples are sliced on a mandoline. If you didn't have one perhaps a wide vegetable peeler would give you the super thin slices you need.

Apple & Cinnamon Tarte
3 apples sliced on a mandoline, leave the skin on, 1 sheet puff pastry defrosted, 30 gm raw sugar, 1 tsp ground cinnamon, 20 gm butter

Heat the oven 220.c. Place tray in to heat.

Place the sheet of pastry onto a piece of baking/parchment paper big enough to cover you baking tray. Using a fork prick all over the base.

Mix the sugar and cinnamon together. Layer the apples leaving a 1 cm border. Sprinkle over half the sugar & dot over half the butter. Remove baking tray from the oven, carefully place the sheet of paper with the tart on the tray.


Ready to go in the oven


Bake for 8 - 10 minutes or until the edges of the pastry are starting to brown. You may need to turn half way to ensure even browning.

Remove from the oven sprinkle with the other half of sugar and dot with the remaining butter. Return to the oven and bake for further 10 - 15 minutes, or until the pastry edges are puffy and brown and the apple slices are cooked.

Remove from the oven slice and serve with cream or ice cream or both if you are feeling decadent.

Tuesday, June 21, 2011

Apple Turnovers

After making pasties on Friday, I had leftover sheets of puff pastry.

What to do ?

Looking around my kitchen for inspiration, I spotted the large bag full of home grown Granny Smith apples that had been given to me. How about apple turnovers, they are very simple to make and even easy to eat straight from them oven with cream poured over them.

The filling needs to be cool so you can make it earlier in the day, or even the day before and keep it in the fridge.

Apple Turnovers
4 sheets puff pastry, 8 - 10 large granny smith apples: peeled cored and cut into cubes, 100 gms butter, 1/2 cup brown sugar, 2 tsps each ground cinnamon and star anise, optional 2 tbsps brandy or marsala, 1 egg beaten for egg wash, extra caster sugar to sprinkle on top of turnovers

Melt butter in a frypan add sugar, apples and spices, bring to the boil, cover and reduce heat, simmer 10 minutes. Check if the apples are tender, if the are but there to much liquid leave the lid of and increase the heat and leave it to simmer until the liquid has reduced. If using alcohol add now and let simmer for 2 minutes.

You do need a small amount of liquid to keep the apples moist, but not that much so the apples are sloppy.

Remove from heat, place into a bowl put aside to cool.

When the filling is cold, preheat the oven 200.c. Line your baking trays with baking/parchment paper.

Place the sheets of pastry on your bench. Cut each sheet into 4 squares. Now you can make oblong or triangle turnovers. Place heaped tablespoons of mixture, you may need more to fill the turnover, on 1 half of each square, leaving a 1 cm border around the edge. Brush the edge with the beaten egg, fold over and press down edges with a fork, also pierce the the centre of the turnover once with the fork, to allow the steam to escape. Place onto the trays brush with egg and sprinkle with extra sugar.

Bake 20 minutes or until golden. Remove and serve with pouring cream and enjoy.


Monday, June 6, 2011

Individual Chocolate Trifles


Sorry there hasn't been any blogs for a few days, a family emergency caused an urgent trip to Melbourne. So over the next couple of weeks the blogs might be intermittent.

As I haven't cooked in the last few days, I don't have any interesting recipes to write about, but I will give you a recipe for individual chocolate trifles. Which can be adapted to your flavours or what ingredients you have in your pantry.

Chocolate Trifles
Store bought or homemade chocolate cake, 1 can black cherries that have been pipped, liquor of your choice - like frambroise, cherry brandy, port, grated chocolate, cream softly whipped with a small amount of icing sugar and vanilla essence/extract

Start you layers by placing some sponge in the base of the individual bowls or glasses, drizzle on some liquor, or if you don't wish to add alcohol use some of the cherry juice. Then add a layer of cherries, then cream, then chocolate. Continue layering, making the last two layers cake, then as Nigella says a billowing cloud of whipped cream on top, shower it with grated chocolate.

If you have all the ingredients in your pantry you should be able to create these desserts within 15 minutes.

Monday, May 30, 2011

Apple Clafouti - Clafouti aux Pommes

Here is the book ready to go.

Well I have cooked my first recipe from Julia Child's book - Mastering the Art of French Cooking. An apple clafouti.

It turned out to be a very easy recipe, to think that if I had read the book when I got it I could have tasted this recipe ages ago. Never mind I am using it now.

It was not only easy to make but also very yummy to eat, I did alter the recipe, by not heating half the batter in the dish until it started to set, then adding the apples, then the rest of the batter. I poured it straight over the apples, and it worked out perfectly fine.

While Mr CLI was eating the clafouti, he was telling me I can make it again when ever I want !

Clafouti aux Pommes
Apples
4 large apples - enough when peeled, cored and cut into 1/2 cm slices to equal 3 cups, 3 - 4 tbsps butter, 1/4 brandy, dark rum or cognac, 1/2 tsp cinnamon, 1/3 cup sugar

Melt butter frypan, add apples cook over medium heat until nearly cooked through. Add alcohol, when it has stopped sizzling, add cinnamon and sugar stir remove from heat. Leave for 1/2 hour. Using a slotted spoon place apples into a buttered 20cm pie dish. Drain and measure sugar syrup left in frypan, add enough milk to make up the 1 1/4 cups required.


Batter
1 1/4 cups milk, 1/3 cup caster sugar, 3 eggs, 1 tsp vanilla essence, 1/2 cup SR flour

Place all the ingredients in order given in a blender, blend for 1 minute (it really needs to be in a blender I did it in my mixer and because the flour to liquid ratio is low the flour lumped and I had to push the batter through a sieve to remove the flour lumps)

Pour over the apples, bake 45 minutes, or until cooked when a knife is inserted in the centre. When checking it looks like a baked custard.

Remove from oven leave 5 minutes. Serve dusted with icing sugar and whipped cream or ice cream, or both if you want.


Thursday, April 28, 2011

April Daring Bakers Challenge - Maple Mousse served in a edible container


Blog-checking lines: The April 2011 Daring Bakers’ challenge was hosted by Evelyne of the blogCheap Ethnic Eatz. Evelyne chose to challenge everyone to make a maple mousse in an edible container. Prizes are being awarded to the most creative edible container and filling, so vote on your favorite from April 27th to May 27th at http://thedaringkitchen.com!

I created this mousse, but it didn't quite set so it is in a glass bowl, for the container I couldn't come at bacon. So I made meringue nests.

Maple Mousse:

Ingredients:
• 1 cup (240 ml/ 8 fluid oz.) pure maple syrup (not maple-flavoured syrup)
• 4 large egg yolks• 1 package (7g/1 tbsp.) unflavoured gelatine
• 1 1/2 cups (360 ml. g/12 fluid oz) whipping cream (35% fat content)

Directions:
1. Bring maple syrup to a boil then remove from heat.
2. In a large bowl, whisk egg yolks and pour a little bit of the maple syrup in while whisking (this is to temper your egg yolks so they don’t curdle).
3. Add warmed egg yolks to hot maple syrup until well mixed.
4. Measure 1/4 cup of whipping cream in a bowl and sprinkle it with the gelatine. Let it rest for 5 minutes. Place the bowl in a microwave for 45 seconds (microwave for 10 seconds at a time and check it in between) or place the bowl in a pan of barely simmering water, stir to ensure the gelatine has completely dissolved.5. Whisk the gelatine/whipping cream mixture into the maple syrup mixture and set aside.
6. Whisk occasionally for approximately an hour or until the mixture has the consistency of an unbeaten raw egg white.
7. Whip the remaining cream. Stir 1/4 of the whipped cream into the maple syrup mixture. Fold in the remaining cream and refrigerate for at least an hour.
8. Remove from the fridge and divide equally among your edible containers.


Meringue (optional):

Ingredients:
• 3 large egg whites at room temperature
• ¾ cup (165 g./5.5 oz) sugar

Directions:1. Preheat the oven to 300 degrees F/150 degrees C.
2. Put the egg whites in a large bowl. Using an electric mixer beat for a few minutes until the whites become stiff. Now add the sugar, a little at a time, whisking until the mixture is stiff and glossy. You should be able to turn the bowl upside down and the mixture won’t fall out.
3. Place baking parchment on to a clean baking sheet. Using a spoon or a piping bag, dollop the meringue into circles that fit inside the rim of your edible cups. (See mine, I wanted height but they fell a bit...which is OK...freeform art)
4. Put the tray in the oven, then immediately turn the oven down to 250 degrees F/130 degrees C. and bake for 45 minutes.
5. Turn off the oven and allow the meringues to cool in the oven for a few hours.
6. Place meringues as decoration on your maple mousse which has already be spooned into your edible containers.


So enjoy making them.

Monday, April 18, 2011

Apple Crumble

Now when Miss Fish wants to help me cook, I need easy recipes that she can stir or mix, or even turn on the mixer. Her cutting skills are limited but she can peel and cut the apples into cubes. I 1/4 the apple and remove the core.

Now I love apple pie, I also don't mind making it, but for a quick and warming apple dessert, this apple crumble appears regularly on our menu.

It is a very expandable dessert you can use as little a 3 large apples or as many a a dozen. It all depends on how large you want to make the crumble. I use a mixture of apples, if you only use granny smiths I would add extra sugar. If you are using all sweet apples, you can also add the grated rind of a lemon and 2 teaspoons of the juice, this gives it a slight tartness.

The topping can be altered too, I have in the past added shredded coconut or slivered almonds. You can alter the spices too, I always add cinnamon, but I also have added aniseed, star anise,
cardamom - my favourite. It is up to your personal taste and what you have in your cupboard.

Apple Crumble
Base
6 large apples, peeled 1/4 , cored and cut into 2-3 cm cubes, 1/4 cup brown sugar, 1 teaspoon cinnamon, 1/4 - 1/2 teaspoon of another spice - I used star anise for this one, 1 cup water

Mix apples with sugar and spices in a microwave proof bowl or jug. pour over water loosely cover with a lid or cling wrap. Cook in the microwave for 5 minutes stir, cook for a further 3 - 5 minutes or until apples are cooked through but not mush. Place it in your dish that you are going to cook it in, judge how much of the syrup you put with the apples. I usually put enough to cover the base. You need just enough so the it bubbles up around the edges when cooked.


Topping
1 cup rolled oats, 1/4 cup brown sugar, 1/2 cup plain flour, 1 teaspoon cinnamon, 1/4 -
1/2 teaspoon of another spice, 2 tablespoons butter - softened


Mix together all ingredients except the butter. Add the butter and rub or I use a fork mix it in till some of the mixture forms clumps. Sprinkle over the apple mixture. Cook 180.c for 15 - 20 minutes, or until the is golden and the juices are bubbling. Serve with cream and/or ice cream.


You can make both the apple and the topping earlier in the day, and leave until you are ready to cook it. Don't place the topping on top of the apples until you are ready to cook as the apples will make the topping soggy.

So easy to make and even easier to eat. Also it heats up nicely in the microwave the next day.

Thursday, April 14, 2011

No Bake - Rose Chocolate Cheesecake

My youngest daughter who I shall call Miss Fish, as she is a Pisces and loves everything about fish. Cooking them, catching them, eating them. She has fish pictures, fish ornaments and green eyes like the sea, as they can change color like the sea. We even have 4 very well feed goldfish in a pond in the fernery with a waterfall, they are Nemo, Dory, Bruce and Fred.


So she helps out at a food bank and her wages are some of the food products. She is disabled so this is a job that her work takes her to, so that they can help out. She absolutely loves it.

So she presented me with a large bag of chocolate biscuit crumbs. My first thought is what am I going to do with these, then my second thought was what about a cheesecake.

So this recipe came about I was going to use orange flower water, but failing to find any in the pantry I resorted to my old favorite Rose water.

Now this was very easy I made it in a 23cm springform tin so it isn't very high. You could use a smaller tin or double the mixture for the filling if you would like a larger cheesecake. Now this isn't an overly sweet cheesecake it stir retains the tang from the cream cheese which I like.

Rose Chocolate Cheesecake
Base: 2 cups broken chocolate biscuits, 1/3 cup softened butter

In a food processor, process the biscuits until fine add the butter and process until it is starting to clump together. Dump into the tin and press it flat over the base. Leave aside while making the filling.


Filling: 500 grams cream cheese, 1/3 cup caster sugar, 500 ml cream, 2 capfuls rose water or to taste, this amount gives it a feint hint of rose not a strong flavour - you could replace it with orange blossom water, pure vanilla extract or even 2-3 tsps of lemon juice

Place soft cream cheese in a mixing bowl with a paddle - you could also use a food processor if you wish. Beat until smooth, add the sugar beat until the sugar has dissolved and the colour actually goes whiter, about 3-5 minutes. Stop mixer scrap down sides and add cream, beat until all mixed together and there are no lumps, you may need to scrap the sides and paddle a couple of times. Add flavouring beat until incorporated 30 seconds - 1 minute.


Now this is a quite a thick mixture place it over the base and spread carefully about. Put into the fridge for at least 2 hours.

To serve run a knife around edge of tin then remove the sleeve. Slice and enjoy.

Monday, February 28, 2011

Daring Bakers Challenge February 2011

The February 2011 Daring Bakers’ challenge was hosted by Mallory from A Sofa in the Kitchen. She chose to challenge everyone to make Panna Cotta from a Giada De Laurentiis recipe and Nestle Florentine Cookies.

Well my first ever Daring Bakers challenge, the days disappeared before I realised that I had to start cooking, but I made it in time !

The result, a beautiful creamy but not too sweet panna cotta and sticky chewy florentine biscuits, both a hit with my husband and daughter.


Panna Cotta Recipe - by Giada De Laurentis

Ingredients
I sachet unflavoured gelatin ( 1 tablespoon - 15 ml - 7 grams) 1 cup (240 ml) whole milk
3 cups (720 ml) cream 1/3 cup (80 ml) honey 1 tablespoon (15 ml) sugar
pinch of salt 1 vanilla bean split in half seeds removed

Additional flavourings - food grade lavender buds and rosewater

Pour the milk into a chilled bowl, I placed a small glass bowl in the fridge while I was measuring out the other ingredients. Place cold milk into the bowl then sprinkle the gelatin over evenly. Leave for 5 minutes for the gelatin to soften.

Pour the milk into a saucepan, over medium heat, heat mixture until hot NOT boiling. I whisked every couple of minutes, it took about 5 minutes.

Next add remaining ingredients, leaving it on the same heat, whisk until sugar and honey have dissolved and mixture hot again NOT boiling. About 5 minutes.


Remove from heat. At this stage I placed a generous third of the mixture including the vanilla pod in a glass bowl, the other third in another bowl to which I added 2 teaspoons of lavender buds and to the remainder in another bowl I added two capfuls of rose water.


Leave for 10 minutes. Pour the vanilla and rose panna cotta into seperate glasses/ramikens. For the lavender one I strained the lavender buds pressing them to extract as much flavour as possible. I retained a few to sit on top of the panna cotta, so that you could see it was lavender. Set in fridge 6 hours or overnight. Garnish and serve, I garnished the rose panna cotta with rose petals.

Nestle Florentine Cookies
Ingredients
2/3 cup (160 ml) (150 gm) unsalted butter 2 cups (480 ml) (160 gm) quick oats
1 cup (240 ml) (230 gm) granulated sugar 2/3 cup (160 ml) (95 gm) plain flour
1/4 cup (60 ml) dark corn syrup 1/4 cup (60 ml) whole milk
1 tsp (5 ml) vanilla extract pinch of salt

Preheat the oven to moderatley hot 190.C (375.F). Prepare baking sheets with silpat or baking paper.

Melt butter in medium saucepan, then remove from the heat. - I did this in a large jug in the microwave.

Add remaining ingredients to melted butter, mix well.


Drop tablespoons full, three inches (75 mm) apart, onto your trays. Flatten slightly with the back of the tablespoon.

Bake in preheated oven for 6-8 minutes, or until biscuits are golden. Cool completely on cake rack or baking sheets. I used the baking paper they had cooked but moved them a bit so they wouldn't stick to the paper when cool.


Melt chocolate in the microwave ( 1 - 1 1/2 minutes) or over a double boiler, ensuring that the water isn't touching the bottom of the bowl.

Use the chocolate to sandwich the biscuits together or as I did spread some chocolate over the top.

Enjoy !